How to Make an Epic Desk from an Old Piano
Feb 01, 2018
AFFORDABLE DO IT YOURSELF HOME PROJECTS | FURNITURE MAKEOVER | PIANO MAKEOVER | DIY CHALK/MINERAL PAINT
I came across the most amazing upright grand piano in a local facebook group for only $50!
The second my husband returned home and rolled it off the truck, the $50 price tag became clear…

Needless to say, my dreams of no prep work were dashed due to peeling veneer, giant gouges and plain old neglect. Sadly, the damage was not only cosmetic, and without an expensive overhaul, this piano was not playable.

Not all hope was lost, though, because this wasn’t my first unplayable-piano-rodeo. Four years ago I unburied an old upright from my in-laws garage and created at epic piano desk:

I had another piano-to-desk candidate on my hands, but it took me over a year to rally the energy to tackle the prep work. I recently sold my giant navy credenza and was left a big space to fill, so the time had come.
My husband deserves gigantic props on this makeover because, projects like this are no joke! If you ever tackle one, it’s a good idea to have a friend or husband who is on board to help with the dirty work. When I say dirty, I mean DIRTY! After removing the keys, key cover, and wood to reveal the piano guts, we found generations of dust and gross-ness.
This was my cleaning bucket after the THIRD cleaning with a Pine-sol solution:

I tried removing dust from the piano guts with a shopvac, which didn’t do the trick. Then I tried blowing the dust out with the air-blower attachment on my paint sprayer. That helped a little, but not enough. Finally, we dragged the piano outside, and Jason took a power washer to it.

Note: I would NOT clean a piano this way if it were ever going to be played again!
I used CLR to remove as much rust as possible from the strings and metal parts.

Besides the biggest cleaning I’d ever done in my life, there was a TON of peeling-veneer removal and sanding. I never remove veneer that is in good condition—I just paint right over it. But, if paint or veneer is chipping and peeling, you have to remove it.

Once I’d removed the parts I wouldn’t be using and the peeling veneer, I filled the gouges and sanded. Then sanded some more. You can see I really only needed to sand the areas that had the most damage.

Then, we cut a piece of plywood for the desktop.

I used BB Frösch Dark Premium Finishing Wax to dark wax the areas that had been sanded just incase I wanted to distress a little after painting. This way, the dark wood would show through and not the lighter raw wood. Blaire helped with this part.

FINALLY, it was time to paint! I made my own chalk/mineral paint by mixing BB Frösch Paint Transformer with my all-time favorite navy, Benjamin Moore “Hale Navy.” This was the piano after only one coat. I used large and small BB Frösch paint brushes. These brushes are designed to promote the self-leveling properties of chalk/mineral paint, which is great when you don't want to see brush strokes.


One nice thing about this kind of paint that isn’t often talked about is that the underlying surface can be a mix of veneer, raw wood, and different species of wood, but once it’s all painted…you’d never know!

The coverage with BB Frösch and this navy is amazing every single time. I ended up needing only two coats!
Note: The white piano desk I did a couple of years ago took three coats because I was painting white over black.
I did a little light distressing with 220-grit sandpaper, then sealed with BB Frösch Clear Premium Finishing Wax.
I added a little dark wax over some of the grooves to help them show up and appear a little more aged, but I didn’t photograph this step. Painting and waxing were the fastest part of the whole project!


Once the navy parts were painted and sealed, I used BB Frösch Paint Transformer, mixed with Benjamin Moore “Mink” as well as BB Frösch Dark Premium Finishing Wax to create a “faux” stain for the desktop. If you know me, you know I NEVER use traditional stain! Faux staining with BB Frösch is way easier and way less messy. Click here for a faux stain tutorial.

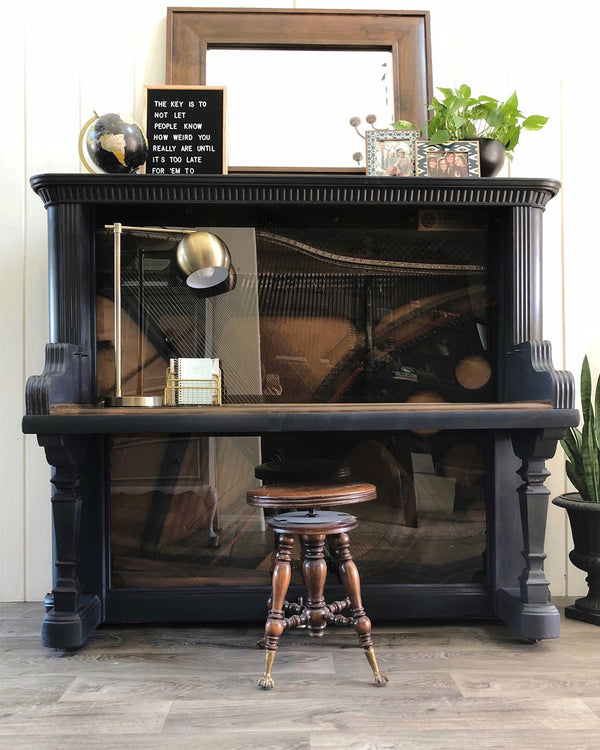
Next, we installed plexiglass to showcase the amazing interior. I wasn’t about to cover it all up, especially since we worked so freaking hard to clean it! We had a local glass shop cut two pieces to fit the top and bottom. This cost about $130.

Note: Jason spent a fair amount of time cutting and installing trim to secure the plexiglass. Since every piano is different, I won’t make this post even longer by explaining this part of the process.

When I look back at what we started with, I’m still kind of in awe of the outcome!

It will probably be another four years before I take on a project this monumental, but I’m loving my new desk!

Photographing the strings and “piano guts” without the reflection of me in my jammies or the disastrous office behind me proved to be more challenging than the makeover itself!


Notice I still have the same globe and light from the first piano-to-desk makeover...
