
EASY DIY Coffee Table--with DARK wax!
Nov 25, 2020
EASY DIY COFFEE TABLE | AFFORDABLE DIY FURNITURE | HOW TO BUILD A MODERN COFFEE TABLE | DARK WAX
Kennadi from @flippinkenflips shares how she made the coolest modern coffee table using our favorite BB Frösch Dark Premium Finishing Wax!
I wanted a coffee table and found one I LOVED on Pinterest. So, without further adieu, I set out for Home Depot for wood and placed my Amazon order for these legs!
I didn’t follow a pattern--I just knew the look I wanted and went for it! Here are some lessons I learned the hard way so you don’t have to:
1.) Wax with BB Frösch Dark Premium Finishing Wax wax BEFORE putting the table together. You can always touch up after.
2.) Wipe away any excess wood glue immediately so you don’t end up with any drip marks, or have to re-sand.
3.) Check your couch height and buy legs accordingly… and check again… and again! I ordered two pairs of legs and ended up going with taller ones than I originally thought I would want.
Let’s get started!
Supplies and tools for this project :
- Clamps
- Wood glue
- nailgun/brad nailer
- Dark or Clear BB Frösch Premium Finishing Wax
- 1x8-6ft common board (you will need 3 of these)
- 2x10⁻⁸ft #2/BTR PRIME DOUG FIR (one of these)
- Legs

If you’re smart you’ll have the guys at home depot cut your wood so you'll have less work to do at home.

Cut the 1x8-6 ft boards in half so you end up with six boards that are 3 feet long.
Cut the 2x10⁻⁸ft board into 2 24 inch segments. You will only be using two of these boards, so you'll have some leftover for your next project!
NOTE- this is where I highly recommend waxing--BEFORE assembling everything to save time and arm cramps later on..😉

Line up three of the 1x8" boards side by side to make the bottom of your coffee table. Lay one of the thicker 24" long boards across the short edge of the three boards.
Glue the pieces together with wood glue and hold together with clamps. Then, nail the side piece to the bottom section with a nail gun--spacing the nails about an inch apart.
Do this to both sides.

Place the remaining three boards across the top, then glue, clamp and nail into place. Before nailing, make sure the three boards are pressed together without any gaps.
Wipe away any excess wood glue and leave your clamps in place until the wood glue has dried. (follow directions on your specific wood glue for time)

Sand this puppy!
I sanded each of my edges as well as the top and side surfaces.
I used a 60 grit on the raw edges to smooth, and I used 120-200 grit on the top and sides surface so it didn’t scratch my wood.
At this point, I added the legs. I eventually went with taller legs once I put the table in front of the couch and realized it was a little low.

With the table put together, I waxed with BB Frösch Dark Premium Finishing Wax. I promise you, this would have saved SO MUCH TIME had I waxed it before putting together 🤦🏻♀️
However, I learned so you don’t have to!
If you waxed your table before assembling, now is when you can just touch up any areas that need it.
I am IN LOVE with the way the dark wax makes even inexpensive wood look so amazing!

Legs!!! I went with the 12 inch legs making my coffee table about 22 inches tall. The legs come in various heights, so just add 10" (the size of the table part) to the length of your legs to determine how tall your table will be.

THAT'S IT!
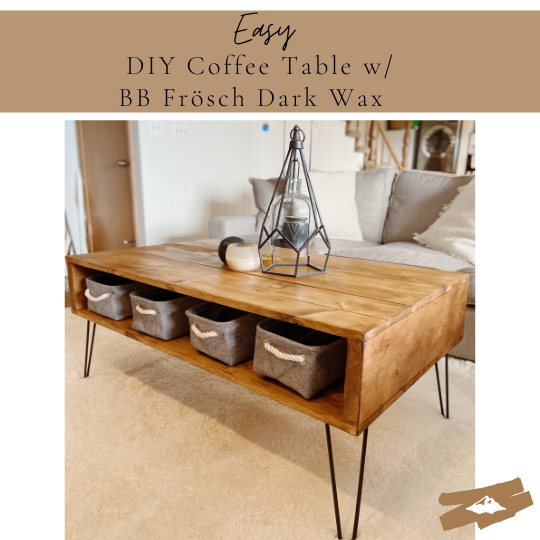
Coffee table complete! This took me less than one day and everyone rants and raves at my new table. I put storage bins inside that I found on Amazon (for remotes, magazines, snacks, etc...), but I love they way the table looks without bins as well.
Thanks for following along! Follow @flippinkenflips on Instagram for more awesome furniture builds and makeovers.