Metal Clock Makeover + 2 Bonus Tutorials
Apr 16, 2015
AFFORDABLE DO IT YOURSELF HOME PROJECT | BB FROSCH | CHALK/MINERAL PAINT DO IT YOURSELF PROJECT | PAINTED METAL
In this post, you will learn to:
-
paint metal
-
paint the perfect stripe
-
transfer simple images to painted surfaces
My daughter is a thief.
I can't complain, though, because her thievery represents a sweet form of flattery. When I refinished this dresser several months ago, I barely had time to photograph it before it disappeared...

...into Kennadi's room.
As grateful as I was for the newfound hope that Kennadi's clothes might magically find their way from the floor to the safe and hidden confines of her "new" dresser drawers, I couldn't handle that the mint dresser didn't quite belong.
You may recall Kennadi's love for all-things Beatles. Her entire birthday just one short year ago was centered around the chest I'd painstakingly painted JUST FOR HER:

I wasn't about to re-stake claim on the mint dresser because it represented the hope of a neat and tidy teenager. I couldn't expect Kennadi to abandon her Beatle-mania to accommodate the mint dresser. I also wasn't going to put another penny into re-decorating a room I had decorated more recently than any other room in the house!
Can you see my dilemma?
Determined to marry the dresser with the Beatles room, I wandered around the house in search of a solution.
That's when I spotted this:

There he sat, in all his giant-metal-clock glory gathering dust because I had never found a space for him, just screaming
"I can solve your dilemma! Make ME over!"
Does anyone else have furniture and home decor yell at them? It's surprisingly common in our home.
It gets loud sometimes.
I grabbed the leftover chalk/mineral paint I'd mixed up for the dresser. It's a custom color mixed with BB Frösch Paint Transformer. I get asked for this color more than any other, so here you go:

I budged slightly on my unwillingness to spend another penny and bought two sample jars of flat finish paint from Home Depot--one in white and one in black. I mixed both with BB Frösch Paint Transformer so they would bond to the metal clock without peeling. Click here for a quick tutorial on mixing your own chalk/mineral paint.
If you haven't caught my vision yet, stay with me, because this is exciting...
You can PAINT METAL with BB Frösch Paint Transformer!
AND...
You don't have to spend an arm and a leg to do it!
So many small projects beg me to transform them with chalk/mineral paint, and at $30-$40/quart, I can't afford to do it with the expensive pre-mixed brands--not to mention most of my projects need less than a cup of paint, not a whole quart. With my two newly-purchased sample jars of Behr paint from Home Depot and BB Frösch Paint Transformer, I was about $11 total for this makeover.
Once you've mixed your paint, hole yourself up for a few hours, like I did, and go make some magic happen!
STEP 1: Disassemble Clock

The glass and clock face were held in place by the same kind of thingamajigs used to hold glass pictures into photo frames, so this part was easy.
STEP 2: Paint Metal Frame and Clock Face White

Paint mixed with BB Frösch Paint Transformer has incredible coverage. This took just two coats of paint.
I love that, with chalk/mineral paint, regardless of the surface you are painting (in this case a metal frame and a cardboard clock face), the painted outcome is uniform and consistent.
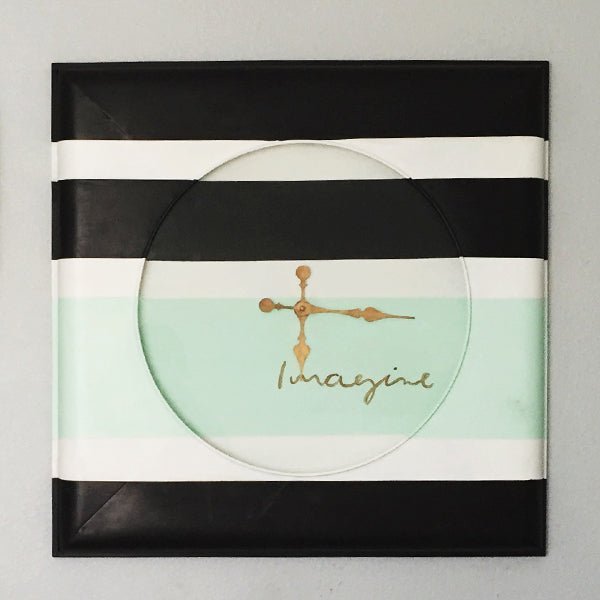
STEP 3: Lay Frame and Clock Face Side-by-Side and HOLD ONTO YOUR SEAT while I share this mini-tutorial:

It is important to lay your frame and clock face side-by-side so your stripes line up. You will tape over the areas you want to remain the base color. In my case, I wanted small white stripes. The small strip you see between each piece of blue tape will remain white as well as whatever is under the tape.
STEP 4: Paint Edges of Blue Painters Tape with Base Color (white)

This is the secret to perfect stripes! Funny how the best secrets are pretty simple sometimes...
By painting the edges of the tape with the same base color (in this case, white), you create a barrier so the the next color can’t sneak under the tape.
STEP 5: Paint Stripes

Avoiding the thin strip between the lines of blue tape because I wanted that area to remain white, I painted the thick strips--three black, and one mint. If you look closely, you can see where I painted the edges of the blue tape first with the white I'd used for base coat before painting with black and mint.
STEP 6: Remove Tape

Before paint is fully dry, gently pull tape away from the stripe you just painted. Check out that crisp, clean line!
STEP 7: Prepare for Mini-Tutorial #2

STEP 8: Using a standard inkjet printer, print Image to be transferred in reverse
I came across a picture of John Lennon's actual handwritten words to the song "Imagine." I just printed the word "Imagine" in reverse with my standard inkjet printer. The printer ink alone is usually enough to transfer to whatever I’m painting. It’s WAY less messy than graphite paper.

STEP 9: Rub Image onto Painted Surface
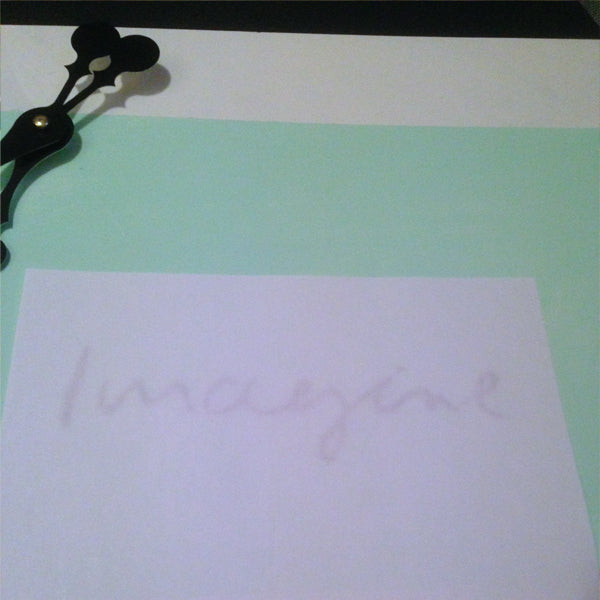

Place your image, printer-ink-side-down, onto your surface and, with a popsicle stick or dull pencil, rub the backside of the image. This will transfer enough of the printer ink onto your surface to give you a guide so you can hand-paint over it.
STEP 10: Paint Over Transferred Image or Word
I used Martha Stewart’s Metallic Glaze because I wanted a little shimmer. I decided at this point to paint the clock hands to match the word.

STEP 11: Wax to Seal and Protect Your Gorgeous Work


I have used nearly every finishing wax under the sun, and have yet to find anything as amazing as BB Frösch Premium Finishing Wax. It dries and cures within minutes, not days or weeks--enough said.
STEP 12: Re-assemble Clock and Admire Your Mad Skills

The real test came when Kennadi's birthday rolled around. She had no idea what I had in mind for making the mint dresser work in her room, so I crossed my fingers and held my breath that she would approve...

...SHE APPROVED!