Frequently Asked Questions
Whether you’re new to BB Frösch or a seasoned paint pro, we know questions can pop up as fast as inspiration strikes. This page is your go-to guide for everything from product tips and techniques to shipping and wholesale info. Don’t see what you’re looking for? Just hop on over to our contact page—we’re always happy to help.
Paint Related
Mixing Directions
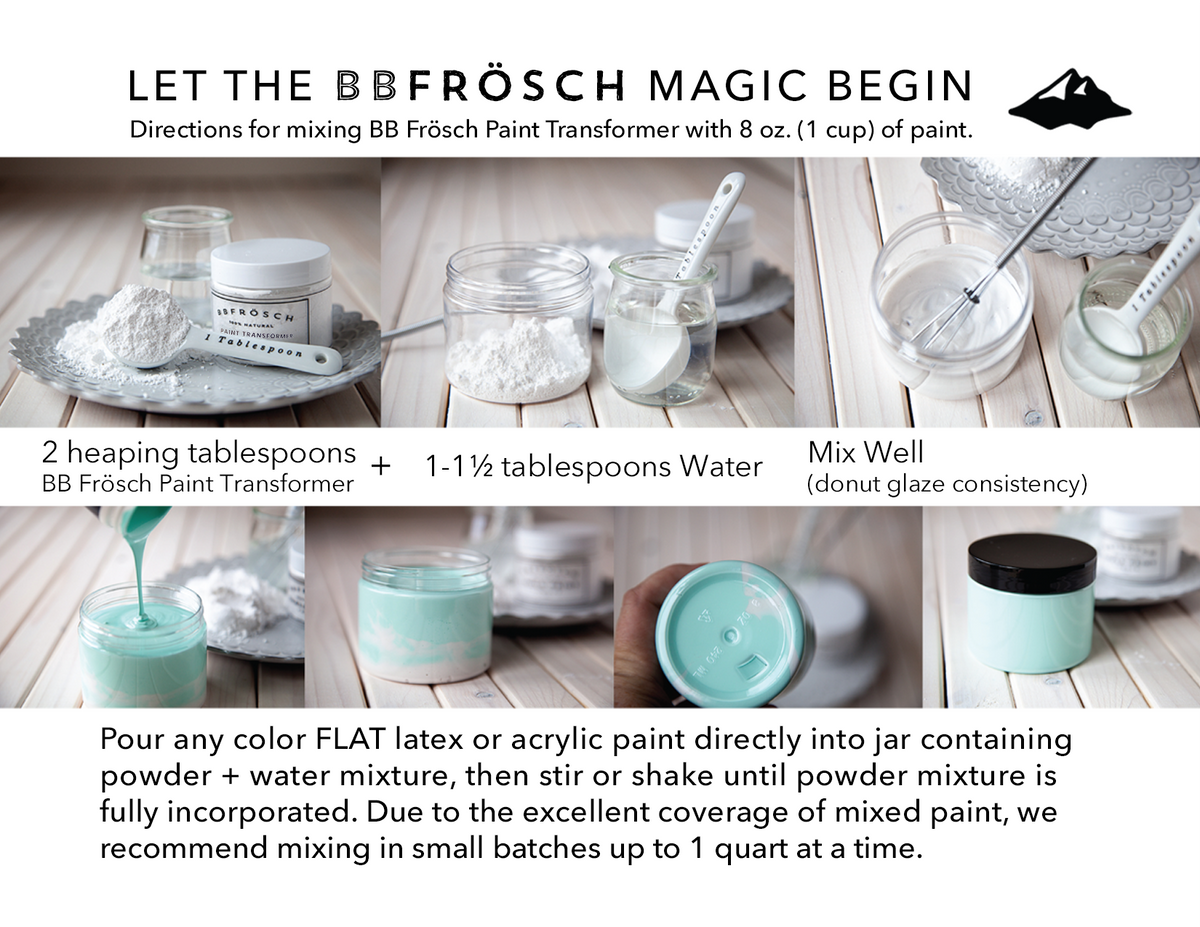
How to Make Chalk/Mineral Paint with BB Frösch Paint Transformer*
Directions for mixing 8 oz. (1 cup) of paint.
*see below for larger quantities
HOW MUCH IS A TABLESPOON?
We recommend HEAPING tablespoons of powder. It is better to err on the side of MORE powder than not enough, since the powder is what helps your paint bond. Without enough powder, it will be just like painting with regular latex paint that will want to peel or chip off.
The more BB Frösch powder that is used, the thicker the paint+water mixture will be, and the more your paint will thicken over time, but that’s okay! Read more about thickened paint here.
*TO MIX 1 QUART
It is recommended to mix up just 8 oz. at a time for three reasons:
- Due to excellent coverage, many projects can be completed with just 8 oz. mixed paint
- It is easier to fully incorporate the BB Frösch powder mixture in smaller batches
- Although mixed paint stores indefinitely, why mix up more than you need?
Still want to mix more? O K A Y . . .
In a separate quart-sized container (we recommend a clear container so you can see when the powder+water mixture is fully incorporated), mix the contents of 1 small jar BB Frösch Paint Transformer with 4 to 5 tablespoons water until a thick but creamy “donut glaze” consistency is achieved. Too pasty? Add water! Add FLAT FINISH paint and stir WELL until powder+water mixture is fully incorporated. Store any unused paint in an airtight container.
What Kind of Paint Should I Use?
One of the best things about BB Frösch is that it can be used with ANY BRAND of flat finish latex or acrylic paint. We recommend flat finish. If your paint has primer in it, that’s okay—you will still get all the great properties of chalk/mineral paint, it may just thicken a little more when stored.
Behr is a great brand for convenience because it is readily available in sample 8 oz. jars that can be tinted any color for about $3. Behr is also available with No-Voc’s.
Other brands have sample jars varying in size from 6-12 oz. but may not be available in flat finish. If you select a finish other than flat (eggshell, satin, semi-gloss, or high gloss) be sure to increase your paint transformer--the more sheen, the more paint transformer. You can double the amount of powder to help paint with sheen bond.
We LOVE Benjamin Moore and highly recommend it. Many locations only offer this brand in a quart. However, just because you buy a quart, doesn’t mean you have to mix the whole quart. For most projects, we still recommend mixing just 8 oz. (1 cup) at a time.
Can I use Eggshell, Semi-Gloss, or High-Gloss Paint?
For optimal results, and to achieve all the wonderful properties of chalk/mineral paint, it is recommended to use a FLAT FINISH paint.
Any desired sheen can easily be achieved in the finishing/sealing stage.
BB Frösch Paint Transformerwill help eggshell, semi-gloss and high-gloss paint bond, but the other chalk/mineral-paint features like distressibility will be compromised.
If you aren’t worried about distressibility, and simply want a high sheen paint that will bond, we recommend adding extra powder. You can double, or even triple, the amount of powder! This will increase bonding properties as well as other desirable properties of chalk/mineral paint.
How Much Paint/How Many Coats Will My Project Require?
While we can’t say exactly how much paint you will use or how many coats it will take, we CAN tell you that you will use less paint and fewer coats than if you were using other types of paint. Typically, 1-3 coats.
A small jar of BB Frösch Paint Transformer mixes up to one quart of paint. However, we rarely mix a whole quart at a time, because many projects like the ones below will only require a cup (8 oz. sample jar from the local hardware store) since the coverage is so great! If your project ends up requiring more than a cup, you can always mix more. There's no need to have a bunch of mixed leftover paint sitting around--save the powder for a new project in a new color!
A number of factors determine how much paint/how many coats you will need:
- What color is your original surface?
- What is the original surface made of?
- How big is the project?
- What color are you painting?
- What technique and method of application are you using?
- What is the final look you want to achieve?
If the original surface is black, and you are painting white, it will take more coats than if you are painting brown on black, for example.
Highly porous surfaces (raw wood, for example) may require more paint, depending on the technique.
The size of your project is the biggest indicator! A small table or dresser will typically require an 8oz. sample jar (1 cup) whereas a small kitchen will require a quart or more.
If applying with a sprayer, you will typically use more paint.
Faux stain or lime wash techniques will use significantly less paint than if you are painting a solid color.
If you intend to distress for a shabby chic look, you will use less paint than if you want a smooth, full-coverage modern piece
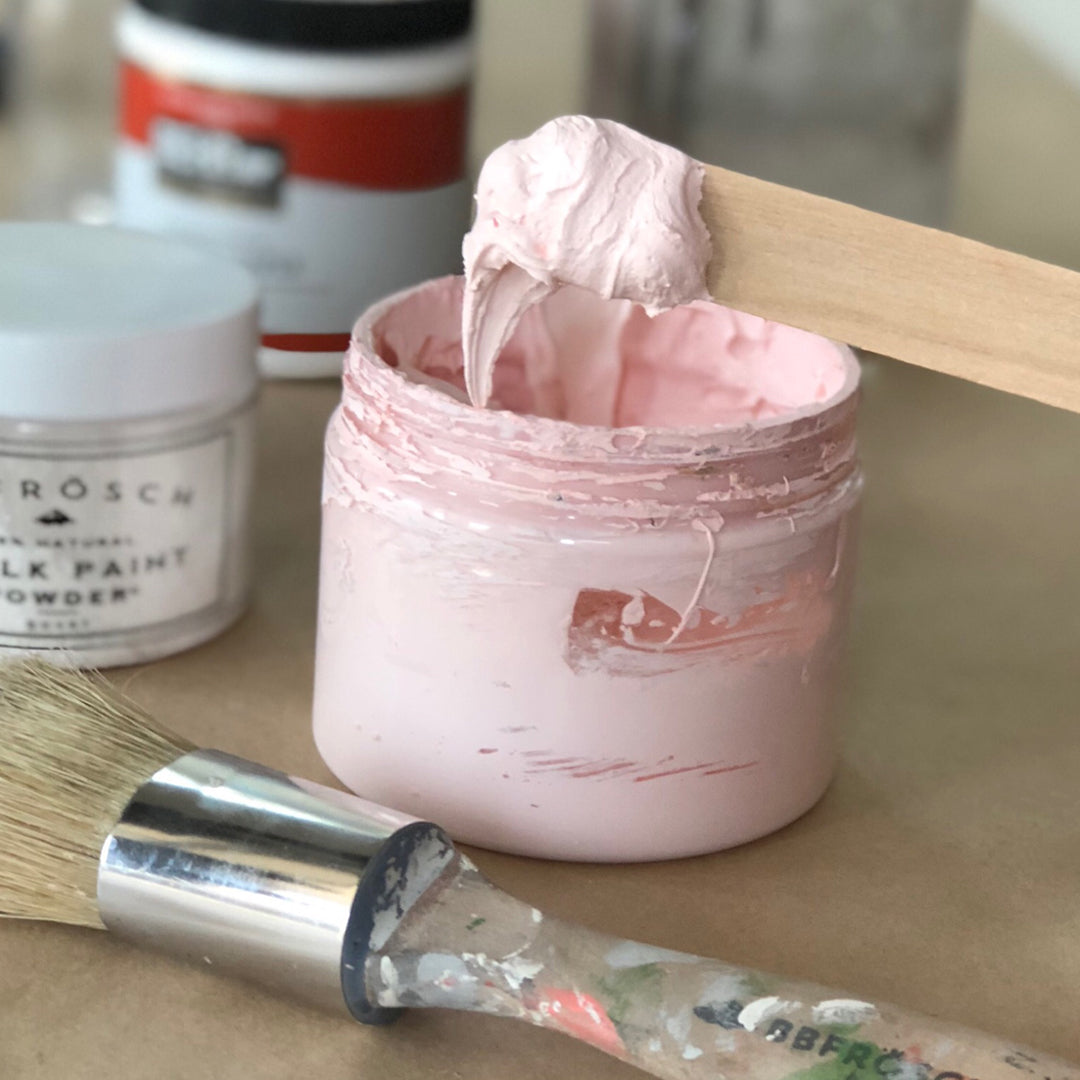
What If My Paint Is To Thick?
Depending on how much BB Frösch Paint Transformer is added during the mixing process, the resulting paint can become quite thick over time. Additionally, paint containing primer will also thicken when stored. NO WORRIES! Just gradually add water while stirring until the desired consistency is achieved.
The ability of chalk/mineral paint to thicken means you can achieve additional finishes such as Impasto or a Venetian Plaster look and feel. If you haven’t tried painting with thickened chalk/mineral paint, consider it! You may discover a new finish you like!
A final option for paint that has become thicker than you like is to simply not store mixed paint. Just mix up as much as you need for a project—if you need more later, mix more.
Brush & Application-Related
Do I Need A Fancy Brush?
The short answer is NO! Chalk paint can be applied with any application method including a roller or sprayer. However, to achieve all the techniques and finishes chalk paint is capable of achieving, BB Frösch brushes are recommend. Features include:
- Natural, chisel-tipped bristles aid in self-leveling properties
- Thick, oval brush head means less brush loading which cuts down on overall project time
- Dense brush head means more paint on your piece and less paint absorbed into your brush
- Wide ferrule and shorter bristle length aids in bristle stability which helps eliminate “flipping” of paint when painting in cross-hatch strokes. Bristle stability is essential for highly texted and grooved areas.
- Shorter handle makes painting in tight areas easier
- Designed to last years when treated with care. In fact, they get better with age!
What Is The Difference Between Paint and Wax Brushes
BB Frösch specialty paint and wax brushes are made with the same chisel-tipped bristles in either natural or synthetic. However, there are a few specially-designed features of each that make specialty paint and wax brushes ideal for their intended purpose. Although a paint brush can be used to apply wax and vice-versa, we recommend that once a brush is used for one purpose, it becomes designated for that purpose only. Because wax is designed to seal and protect, once a brush has wax in it, using it to apply paint can give less-than-desirable results.
BB Frösch synthetic brushes are soft yet durable and will not fray. Although both our natural and synthetic brushes are designed to last when properly cleaned and conditioned with BB Frösch Brush Conditioning Soap, synthetic bristles will tend to have less breakage over time.
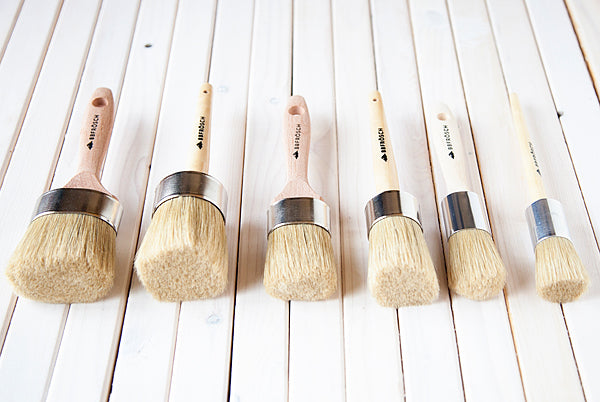
Specialty Chalk Painting Brushes
BB Frösch chalk painting brushes come in three sizes. The rule of thumb is, the bigger the project, the bigger the brush. However, even on large projects, a small brush comes in handy for corners, grooves and embellishments.
Paint brush features include:
1. Dense Head with sturdy bristles for less paint-loading and no paint flipping when using the recommend cross-hatch strokes.
2. Chisel-tipped bristles help promote the self-leveling properties of chalk paint. Both our natural and synthetic bristles are specially designed so that your paint won’t just absorb up into your bristles, which means more paint gets onto your piece.
3. Oval and Tapered Head is ideal for painting all techniques
4. Wide Ferrule (bristle stability, longer brush life)
5. Short, Contoured Handle (get in tight spaces, comfortable)
Specialty Wax Brushes
As with paint brushes, wax brushes come in three sizes, and the rule of thumb is, the bigger the project, the bigger the brush.
The main difference in a wax brush is the brush head. The dense, round brush head is flat instead of tapered, which is ideal for applying and buffing wax in a circular motion.
How Do I Avoid Bristles In My Paint?
New brushes should be conditioned before the first use to avoid bristles.
Wet the brush, and swirl the brush in BB Frösch Brush Conditioning Soap. Rinse the brush, pulling the lather out until the water runs clear. Beat the bristled end of the brush against the edge of a counter or sink to loosen wayward bristles.
If a bristle does find it’s way onto your painted surface allow your paint to dry first, then try simply rubbing the bristle with your finger or a small piece of 400-grit sandpaper. The bristle should come off nicely without leaving a mark.
Click here for additional tips for adding life to your brushes
How Do I Care For My Brushes?
Turns out most cleaners out there (including your run-of-the-mill dish soap) do an amazing job of STRIPPING THE LIVING DAYLIGHTS out of your brush, making it dry and brittle over time.
How Do I Avoid Seeing Brush Strokes
Some techniques utilize brush strokes to highlight the technique (two-color distress, for example.) So, brush strokes are not always a bad thing! Brush strokes are also more authentic for antiques and older pieces, so don’t be completely opposed to them.
However, if you don’t want to see brush strokes, there are a couple of steps you can take:
- Use a chalk paint brush.
- Kiss your brush with water before loading paint.
- Paint initial strokes in cross-hatches. This will give subsequent coats of paint something to settle into. Painting with the grain on all coats can actually make strokes more visible. If you want to paint with the grain, just do so on the final strokes/coats.
- If you absolutely want to avoid brush strokes at all costs, apply your paint with a sprayer. We recommend the Homeright Finishmax sprayer.
Can I Use BB Frösch In A Sprayer?
YES! Painting with a sprayer is one of our favorite application methods especially for projects like these:
Sealing/Waxing
Do I Have To Wax?
All furniture and cabinets should be sealed for protection after painting. If not, water, distressing, oils, and dirt could damage the surface. We recommend sealing with BB Frösch Premium Finishing Wax. Though any paint sealer will work with chalk paint (polyurethane, polyacrylic, lacquer, etc.), we prefer wax for nearly every chalk painted project (*with the exception of projects listed below) for the following reasons:
- Wax is more than a protective layer, it enhances the look of your chalk painted piece.
- Wax is durable yet it has a professional, soft, smooth (not “plastic”) feel.
- BB Frösch Premium Finishing Wax is EASY to apply! Unlike products that require multiple steps with lengthy dry times, waxing a typical piece like a dresser can be done, start to finish and fully dried, in about 20 minutes.
- Life happens to furniture! It doesn’t matter what the sealer is, if your piece meets up with soccer cleats or spilled nail polish remover, etc. it is going to show! The awesome thing about wax is, when “life” happens, the affected area can be spot repaired without it being glaringly obvious. Polyurethane and other similar sealers require a complete re-do.
- BB Frösch Premium Finishing Wax does not yellow over time.
We recommend wax to seal any fabric furniture that has been chalk painted.
*We recommend poly instead of wax for floors, outdoor furniture and tile.
*Many people prefer poly over wax for high traffic surfaces like cabinets.
*We typically do not seal painted rugs, painted pillow covers, and painted curtains. Wax is not typically necessary for craft and home decor projects, though it can be used to enhance the look and feel.
Chalk/Mineral Painted
It is important to seal most chalk painted surfaces for protection. Any sealer used for paint including wax, polyurethane, poly-acrylic, lacquer, etc. can be used.
They key is understanding your goals and the pros and cons of each kind of sealer.
We recommend wax for nearly every chalk painted project (with the exception of floors and pieces that will be outdoors) for the following reasons:
- Wax is more than a protective layer, it enhances the look of your chalk painted piece.
- Wax is durable yet it has a professional, soft, smooth (not “plastic”) feel.
- BB Frösch Premium Finishing Wax is easy to apply. Unlike products that require multiple steps with lengthy dry times, waxing a typical piece like a dresser can be done, start to finish and fully dried, in about 20 minutes.
- Life happens to furniture! It doesn’t matter what the sealer is, if your piece meets up with soccer cleats or spilled nail polish remover, etc. it is going to show! The awesome thing about wax is, when “life” happens, the affected area can be more easily spot repaired without it being glaringly obvious. Polyurethane and the like require a complete re-do.
- BB Frösch Premium Finishing Wax does not yellow over time. Note: Not all finishing waxes are created equal, so it is important to note that other wax brands can yellow over time.
If using a poly to seal your chalk-painted surface, we recommend using a water-based poly and following the directions on the back of the product you choose. Although application is more time consuming, poly provides a durable finish that can be cleaned with stronger cleaners.
When Waxing, I Sometimes Get Wax Dust or "Pilly" Wax. Why?
One of the greatest benefits of BB Frösch Premium Finishing Wax is that it dries and cures quickly. Yay!
The quick dry time not only means it will dry on your piece quickly, but it will dry in your brush as well–especially if you have too much wax on your brush. Wax “dust” and “pilly” wax is merely excess wax that has either dried on your piece before being removed, or excess wax that has dried on your brush.
You can avoid this by:
- Use a wooden wax applicator to apply only a thin layer of wax to the end of your wax brush (this helps avoid accumulating excess wax on your brush which causes wax dust.) Do NOT dip your brush into your wax jar! You should be able to cover about 1 square foot area at a time. If you are able to cover much more, you are using too much wax.
- When the wax is off your brush and onto your piece, do not re-load your brush yet. Instead, use a lint-free wax cloth to remove excess wax from the area you just waxed. You will know when excess wax is removed when the surface is smooth and no longer tacky, and when your wax cloth glides easily across the surface. Then, re-apply wax to your brush and move on to the next area.
- If excess wax is difficult to “move” or appears “pilly,” the wax has either begun to dry, or you have used more wax than is necessary. No worries! Simply remove excess wax until wax cloth glides easily over surface, and use less wax next time.
In other words, apply wax sparingly over a small area, remove excess, move to next area and repeat–do not wax the entire piece and then remove excess.
Once excess wax has been removed and wax has dried (at least 15 minutes) buff to desired sheen using lint-free wax cloth.
How Do I Clean A Waxed Surface?
We recommend simply cleaning with a damp cloth. Mild cleaners like Greenworks also work well.
If you happen to remove or dull a waxed surface from cleaning with too strong of a cleaner, simply re-wax the affected area.
Do I Have To Re-Wax Over Time?
Re-waxing is typically not necessary. If you find that a waxed surface has dulled over time, usually just buffing with a cloth will bring the shine back.
If wax becomes removed through weathering, heavy use or cleaning, re-waxing may be necessary. There is no need to strip the existing wax first—just apply, remove excess wax, and buff the same way you did with your original application.
Project-Related
Do I Have To Sand My Piece?
No. And Maybe.
The short answer is that BB Frösch Paint Transformer helps any paint to bond with virtually any surface. However, if that surface has peeling or chipping paint, your paint can only bond to what is already chipping or peeling off—it can’t bond to the surface underneath. In this case, you must sand any areas that are peeling and chipping. We recommend a coarse-grit sandpaper.
If you are painting a previously painted or waxed surface, or a surface that has a particularly high sheen, it is also helpful to sand. In this case, you really just need to scuff the surface with a coarse-grit sandpaper to give it “teeth”/something for your paint to grab to. You DON’T have to completely remove the existing finish.
Sometimes When Applying A Second Coat, The First Coat Lifts. Why? How Do I Avoid This?
What causes paint to lift and how do I avoid it?
Chalk paint has the amazing ability to be manipulated. One of the ways it can be manipulated is with water! Before chalk paint is sealed, it can be removed by rubbing with a wet cloth or brush. This is highly desirable for several finishes and techniques including wet-distressing.
This means that, especially on more smooth surfaces (laminate, glass, tile, etc.), applying a second coat of paint can “lift” the first coat. Why? Because the stiffness of the brush bristles combined with newly introduced wet paint can re-activate underlying layers.
You can avoid this by making sure the first coat is fully dry and cure. Even though chalk paint dries quickly, it can take up to a day to cure. For particularly smooth and less-porous surfaces, you may consider allowing the first coat to cure beyond the typical dry time. Additionally, when painting subsequent coats, be sure not to overwork your brush.
What About Painting Laminate Or Other Smooth Surfaces?
Paint mixed with BB Frösch Paint Transformer bonds with virtually any surface. However, there are extra steps you can take to aid with bonding to particularly smooth or challenging surfaces like glass, laminate and metal.
For surfaces other than glass, scuff the surface a bit with sandpaper (60-100 grit works well.) You don’t have to sand through the entire surface, just scuff enough to give paint a little something to bond to.
Add additional powder in the mixing step–double the powder, even! The more powder, the more bonding.
For the first coat, do not aim for full coverage. Just paint a quick, thin coat and allow to dry. Don’t forget to paint using cross-hatch strokes. This will give subsequent coats something to grab to and level into.
Allow extra dry time. Even though chalk paint dries quickly, it is not fully cured for about 24 hours. It helps to give it extra bonding time before distressing or waxing.
Be sure to wax or poly your finished piece to seal and protect it!
Check out these painted laminate examples:

What Causes Bleed-Through, And How Do I Avoid It?
Bleed-through is caused by tannins which are basically water or solvent that has been trapped within the wood at some point. This is more common with older pieces, but it doesn’t happen often. Unfortunately, there is no way to know ahead of time if tannins are present.
No amount of paint, regardless of brand, will cover it. Solutions include:
- Sand through to just below the original surface. This can be done on just the areas where you see bleed-through—the whole piece doesn’t have to be sanded.
- Use a product like Kilz over the area where you see the bleeding. This solution is much easier, but if you want to distress your finished work, you won’t be able to distress through to see the underlying wood.
- Prior to painting, use a product like shellac or polyurethane over your piece. This solution is more of a preventative measure that many refinishers automatically use on antiques. It allows you to distress and see the underlying wood, but be sure to use water-based, not oil-based, or yellowing can occur.
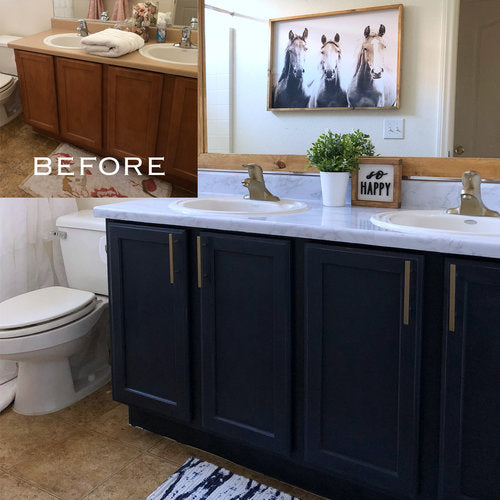
I Want To Paint My Cabinets
BB Frösch Paint Transformer gives you the ability to take on projects like kitchen and bathroom cabinets affordably and with a professional-looking outcome.
However, we recommend a couple of things first:
- Consider taking the Ultimate Guide to Painting Cabinets online workshop! In addition to valuable tips and tricks that will save on frustration while building confidence, you will learn several methods for painting and sealing so you can best decide which approach(es) meet your needs. All this in an online setting that will help make a project like this enjoyable and professional looking.
- If you’ve never chalk painted before, start with a smaller project to get a feel for how to make chalk paint work in your favor. There are many methods and techniques for achieving different looks. Practice will give you an opportunity to discover what suits you best.
- CLEAN your cabinets WELL! Use a de-greaser! Cabinets can be challenging to bond to, not because of the material of the cabinets, but because surface dirt and grease create a layer between your paint and the surface which means your paint is bonding to the grease, not the cabinet.
- Don’t be chintzy on your powder. Use a little extra, even double to recommended amount, to aid in bonding.
- Seal your work! Cabinets are a high traffic area so we recommend at least two coats of BB Frösch Premium Finishing Wax or polyurethane/polyacrylic.
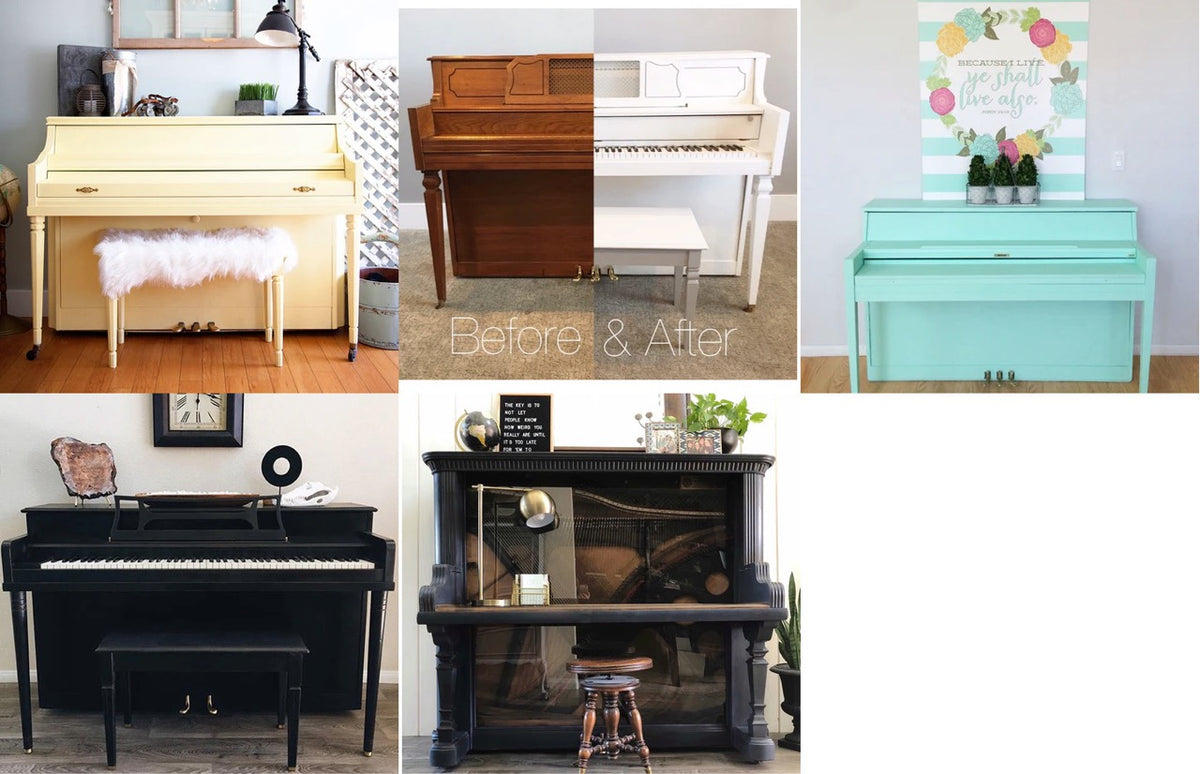
I Want To Paint My Piano
It seems like everyone has a piano, but it’s usually a hand-me-down or a garage-sale find that doesn’t match our style. Since the cost of a piano that DOES match our style is usually beyond all reason, especially since we pretty much just want our kids to learn to play, chalk paint is the perfect solution! Watch for a piano-painting course coming to BB Frösch University in 2021! Until then, check out our favorite piano makeovers…
How To...
Fix Furniture Flaws And Damage
In this course you will learn tried and true ways to easily fix the most common furniture flaws and damage including:
- chewed wood
- bowed wood
- peeling veneer
- doors & drawers that stick
- uneven surfaces with visible grain and pockmarks
- nasty smells
- and more!
Stage, Photograph And Edit Your Creative Work
Photography, editing your photos, and staging make all the difference if you plan to sell your work. Whether you are photographing refinished furniture to sell, or any other creative work, this course is for you!
Paint Cabinets
This course is for YOU if:
- your cabinets are worn and dated
- your plain and boring builder-grade cabinets are in desperate need of a makeover
- your budget doesn't allow for hundreds, or thousands, of dollars to replace your cabinets or hire a painter
- you love a good DIY project that won't break the bank
Paint Metal
Painting metal is such an awesome use of chalk paint—think ugly metal filing cabinets, old-school lockers, galvanized buckets…update ‘em all with fun colors and BB Frösch! Check out one of our favorite examples….
Paint Fabric
Chalk painting isn’t just for furniture and cabinets! Painting fabric is one of our favorite ways to use BB Frösch Paint Transformer—curtains, pillow covers, upholstered chairs, seat covers, and more! Check out one of our favorite examples…
Faux Stain
Ditch the messy, smelly, unpredictable nature of traditional stain! You can have the look of stain in ANY COLOR you want, in a fraction of the time with our favorite “faux stain” technique. It’s perfect for anything that has the appearance of wood grain, even if it’s not real wood (you can’t do that with traditional stain!)—everything from furniture to kitchen cabinets to home decor. Here’s a little inspiration for you:
White Wash
White washing is incredibly easy with chalk paint, and even easier with BB Frösch, since you can choose any color you want--not just traditional white! This technique is great for raw wood when you want the grain to peak through. Since you are adding BB Frösch Paint Transformer to your paint, you can also do this technique on wood that has an existing finish...as long as there is grain to show through.
Kacey shows how amazingly easy it is here: