My Dream Dresser for Under $100!
Sep 30, 2020
HOW TO REMOVE SMOKE SMELL FROM FURNITURE | AFFORDABLE DREAM DRESSER MAKEOVER | DIY PAINTED DRESSER
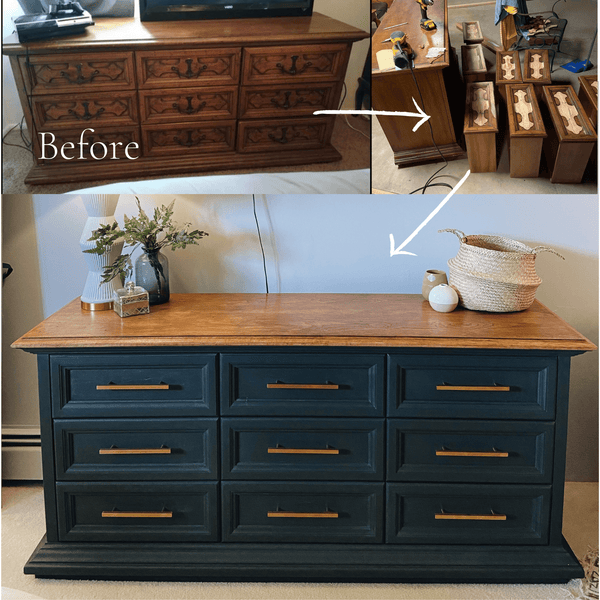
In this post you will learn how I did all this (and removed the years of nasty smoke-smell build-up) for under $100!

My inspiration piece is over $500. That simply wasn't in my budget. Here's how I made it happen for less than $100...
My inspo...

I went to Home Depot and picked the perfect color--"Cracked Pepper" by Behr. I got a sample-sized jar in flat to easily mix with BB Frösch Paint Transformer.

This dresser was extremely smelly due to being in a smoking household for YEARS! If I'm honest, I was a little panicked because I had NO IDEA how to remove the smell--lucky for you, I'm sharing exactly how I did it!
I let it sit out on my back porch in the sun for about 5 days to let it air out naturally and hopefully take some of the smell away.
I made sure to leave the drawers out before I started working on it to really completely air it out. I used this odor eliminating spray and sprayed down my whole dresser (as directed by the bottle instructions.) Surprisingly this took away A LOT of the smell. For the remaining odor I scrubbed the whole piece with white vinegar to be so sure the smell was not going to linger.

This dresser was definitely not my style but my mom gave me the idea to remove the drawer embellishments so I did! I am so glad!
I removed the front embellishment of each drawer with a crowbar and hammer. When there was extra wood or glue left, I sanded it down with 40 grit sandpaper because it was STUBBORN!
Inevitably some pieces that were glued on really well ripped extra wood chunks off which I filled in with wood filler then sanded down flat once dry.


I used my hand sander to sand down the top of the dresser to reveal the beautiful natural wood.

I normally wouldn’t prime my piece at all, however this primer was an odor eliminating primer I got from Home Depot.
The reason I decided to prime was for the soul purpose of the smoke smell being 100% eliminated. After all, my underwear is going in there!
I coated the whole exterior as well as each drawer since that’s where my clothes would be. The primer went on white but dried clear.

Once I had taken all precautions to remover any odor, I was ready to get painting. I mixed my paint with BB Frösch Paint Transformer. Click here for easy mixing directions.
![]()
My first coat when on so smoothly and had excellent coverage! The color was looking like a blue/gray and I loved how it turned out!
I eventually taped off the top so I didn’t accidentally paint the top where I would be dark waxing.

I purchased this cute contact paper for the interior of my drawers. I used a sewing mat and blade to measure & cut them to size. This part was fairly easy and made a huge, beautiful difference! I did the contact paper as an EXTRA measure of “I don’t want any old smoke smells on my clothes” I think I am safe now!

Once I had finished painting I clear waxed all the gray areas! I used BB Frösch Premium finishing wax. I love this wax because it goes on like butter and cures quickly!
After the main dresser and drawers were finished, I was able to dark wax the top.
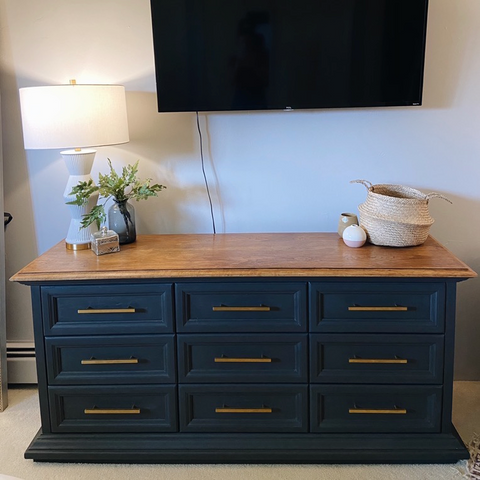
This is when my dresser started to look like my dream dresser. I dark waxed the top which took a total of 5 minutes and it was DREAMY.

I also added these pulls to bring in the gold feature and complement the cool drawer liners.
![]()
I am so happy with how this turned out. I got my dream dresser for an affordable price!

Be sure to follow more of Kennadi's furniture makeovers on Instagram at @flippinkenflips