How I Turned a 30 Year-Old Hand-Me-Down Into Something More My Style
Aug 24, 2022
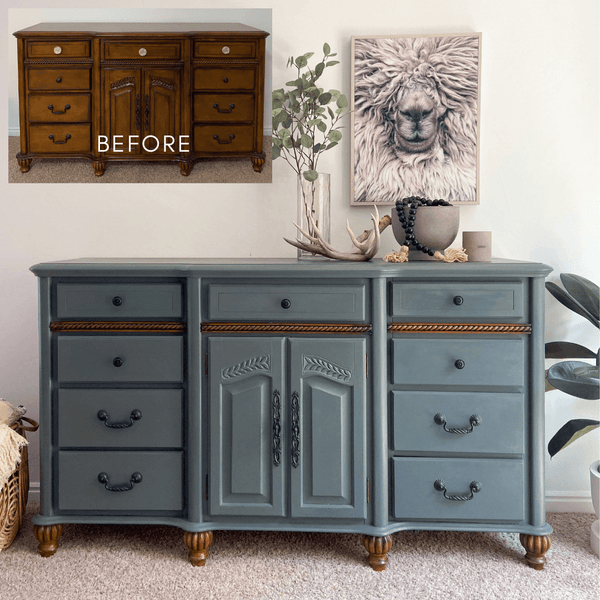
AFFORDABLE DRESSER MAKEOVER | DIY PAINTED DRESSER | HOW TO PAINT WITHOUT SANDING PRIMING OR STRIPPING

I have two sisters, and when we were teens, my parents gave each of us a bedroom set that was high quality and meant to last so we could take it with us when we got married.
My set included a matching poster bed, large dresser, armoir, and two nightstands. Emphasis here on MATCHING. I tried updating the dresser once upon a time with some bold knobs 😬.

Now that I’m married, and we recently purchased our first home, I’ve been itching to transform some of our furnishings to my own style. The whole bedroom set is incredibly well made, but way too “matchy” and just not my taste. Besides, it had collected a few dings and scratches over the years. The dresser from the set was at the top of the list to make over.

When it came to picking a color, I wanted neutral but also not boring. I went with “Pond Stone” which is a Magnolia color, but I had the guy at Ace color match it for me with a less expensive paint. I highly recommend the ebook "Painting Furniture--How and Where to Find Color Inspiration"--it eliminated all the anxiety I usually have over choosing a color.


I planned to add BB Frösch Paint Transformer to my paint so I wouldn’t have to prime or sand first. I did give it a really good clean, though. My little girl even helped.


I recommend removing drawers, doors and hardware before cleaning and painting, so you can catch all the dirt that manages to get under drawer pulls and hinges. Besides, I feel like I can do a better job painting when the drawers aren’t in.

There were two parts of the dresser that I wanted to remain the beautiful wood, instead of painting—the trim below the top drawers and the legs. I taped off the trim and put tinfoil over the legs to keep from getting paint on them. The tinfoil hack is a timesaver and so much easier than tape for things like bulky legs that aren’t squared off.

Now for my favorite part—PAINTING! I mixed my paint with BB Frösch Paint Transformer because cleaning and taping off is all I want to do when it comes to prep work. If I had to sand, strip or prime, I would never paint anything! Paint transformer makes the paint stick without the extra prep work. Click here for directions on mixing paint transformer with paint.

I kept the first coat thin, but it was still pretty great coverage, so I only needed two coats total.
FIRST COAT

SECOND COAT

I wanted a smooth clean look, so I didn’t do any distressing. I did do a quick pass with 400 grit sandpaper to give an extra smooth and “professional” feel to my piece before waxing.
I sealed the piece with BB Frösch Clear Premium Finishing Wax. I typically prefer wax over poly for furniture because I feel like it looks “softer” and less “commercial.” This wax goes on so easily—just apply, wipe off the excess, apply to the next section, wipe off the excess, and repeat until the piece is sealed. By the time you are on the last section, the rest of the piece is already dried and cured, so you can use the piece right away.

Once everything wax sealed, I removed the tinfoil and tape, replaced the drawers and hauled the dresser back into my house. I am finally in love with this dresser, and I feel like it finally belongs in my home.


Reminder of where we started…

Check out the whole transformation from start to finish in this video: